
October starts this Thursday, and I am so excited for all things spooky! From front porch skeletons and flickering jack-o’-lanterns to setting up eerie lighting around the house, the whole place is officially in full-on haunting mode. And honestly, what has more spooky vibes than a cold, dark, mysterious cave? That eerie subterranean atmosphere got me thinking about all the spooky, icicle-like stone formations that hang silently from the tops of caves—which led the kids and me straight into a brand-new science project.
We decided to bring those cave vibes home by growing our own sparkling crystal stalactites and stalagmites right on the kitchen counter! If you need an engaging afternoon activity that uses basic household supplies, keeps the kids off screens, and sneaks in some real subterranean geology with a slightly spooky twist, here is how we made them.
Activity: DIY Crystal Stalactites and Stalagmites
Have you ever wondered how mysterious stone formations grow inside dark caves? In nature, spectacular cave formations like stalactites (hanging from the ceiling) and stalagmites (growing from the floor) take thousands—sometimes millions—of years to form as mineral-rich water drips drop by drop, leaving behind tiny deposits.
While we definitely don’t have that kind of patience with two energetic kids bouncing off the walls, we can speed up time and grow our own stunning crystal columns using a supersaturated solution, cotton string, and a little bit of capillary action!
What You Need:
- Two plastic cups or glass jars
- A small dish or saucer (placed right in the middle to catch drips)
- Thick cotton string or yarn
- Two small weights (like paperclips or washers) to anchor the string
- Hot water
- Epsom salt, borax, or table salt
- Food coloring (optional, to tint your crystals any spooky color you like!)
Step-by-Step Instructions:
- Prep the String: Cut a piece of string long enough to stretch between both cups with a comfortable amount of sag in the middle. Tie a small weight to each end.
- Mix Your Solution: Fill both cups with very warm water. Stir in your chosen salt a little bit at a time until no more will dissolve (until it reaches saturation). Add a few drops of food coloring if desired.
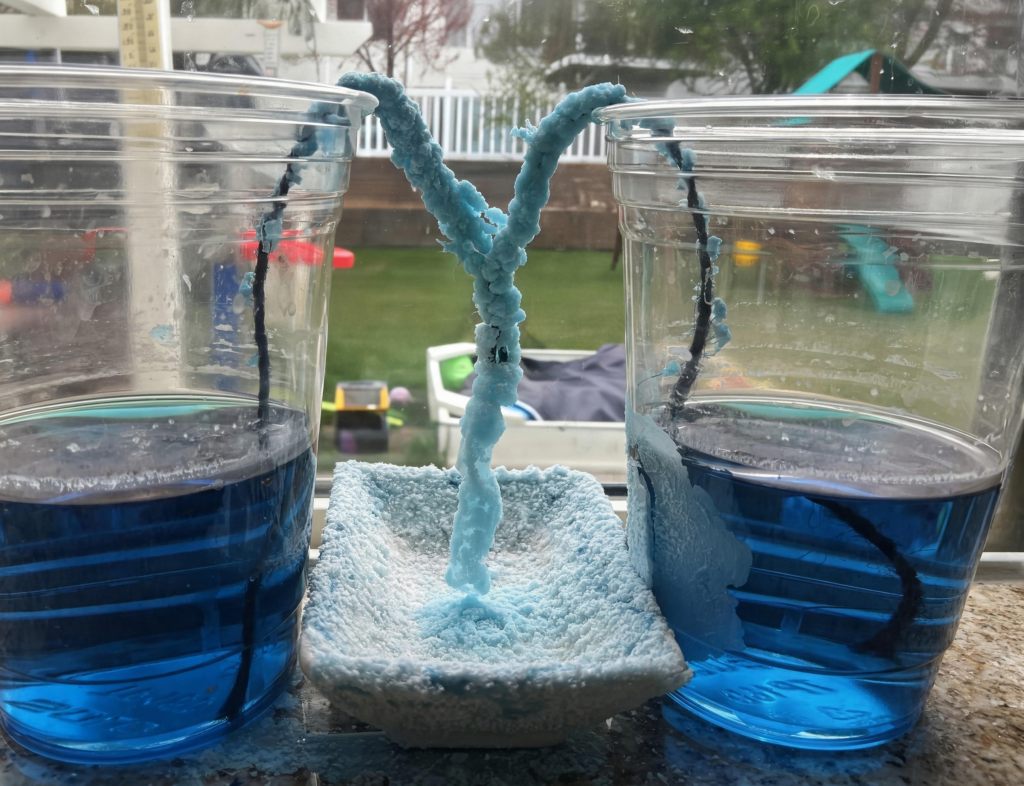
- Set Up the Bridge: Place the two cups side by side, and put your small catching dish right in the middle between them. Drop one weighted end of the string into the left cup and the other weighted end into the right cup, making sure the middle of the string dips down directly over the empty dish.
- Watch It Grow: Place your setup in a safe, undisturbed spot where little hands won’t bump it. Over the next few days, watch as capillary action pulls the solution up the string, crystals begin to form along the hanging bridge, and a matching stalagmite starts building up from the saucer below!
Note from a Geologist (or in our case, my husband):
Deep underground, cave formations rely on slow chemical processes, fluid movement through tiny cracks, and continuous evaporation. In our kitchen experiment, we mimic that exact geological journey: the water travels up the string via capillary action against gravity, evaporates into the air, leaves its dissolved minerals behind to form a stalactite, and drips down to precipitate a stalagmite below!
Wrap-Up & Reflection
This is one of those classic projects that feels like pure magic to children, but sneaks in some genuine earth science along the way. Plus, it’s a fun, slightly eerie way to kick off the October spooky season while exploring how water and minerals interact to shape our planet’s hidden wonders.
Have you tried growing crystals or exploring local cave geology with your kids this autumn? Let us know how your sparkling formations turned out in the comments below!

